Purpose:
The main purpose of this tent is for the quartering of personnel. The maximum capacity of the tent is eight men when the Tent Stove is not used. However, for reasons of greater comfort and sanitation, it is limited to six men when the supply of tentage permits. When the Tent Stove is used, the maximum capacity is six men. Because of its distinctive shape, it is easily observed from the air; for this reason more than usual care should be taken to camouflage it properly. This tent became a “Limited Standard” item in 1944, and was eventually replaced by the Tent, Squad, M-1942.
Characteristics:
a. This tent is 16 feet wide, 16 feet long and 11 feet high.
b. The floor space is 256 square feet.
c. The top, side walls, and all reinforcements are made of 12.29-ounce duck and the sod cloth is made of 9.85-ounce duck. This tent comes in one section.
d. It has a peak height of 12 feet 3 inches and a wall height of 4 feet 2 inches. This gives a pitch of 8 feet 1 inch.
e. It has one door in the wall which is cut back into the roof. This door is 28 inches wide, 8 feet high, and is double-lapped.
f. It is ventilated by a center pole opening which has an adjustable hood or cover. The sides of the tent may be rolled up and the door opened when added ventilation is needed.
g. One Tent Stove, M-1941, with accessories, is used to heat this tent. When stoves are used in the Pyramidal Tent, the stovepipe is put through the center opening.
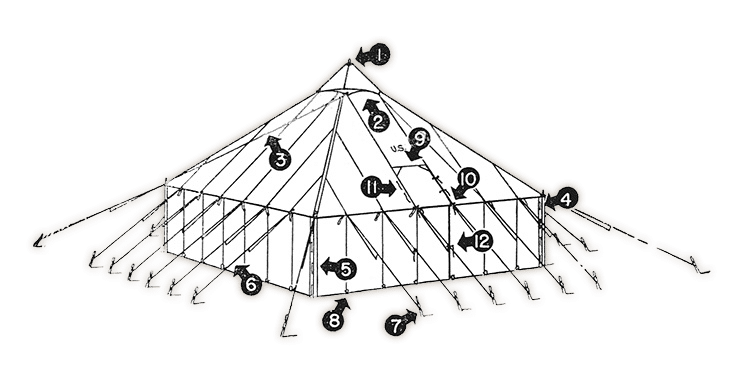
1. Spindle
2. 1 x Hood, Tent, Khaki, Pyramidal, M-1934 (Stock No. 24-H-115)
3. 6 x Lines, Tent, 13′ 6″, sewed-1-end, ¼” dia. (hood line) (Stock No. 24-L-562-50)
4. 4 x Lines, Tent, 6′, sewed-2-end, ¼” dia. (lacing line) (Stock No. 24-L-500)
5. 4 x Poles, Tent, Upright, 4′ 9″ (Stock No. 24-P-235)
6. 24 x Lines, Tent, 10′, w/ eye, 5/16″ dia. (eave line) (Stock No .24-L-540)
7. 28 x Pins, Tent, 24″ (Stock No. 24-P-59)
8. 28 x Lines, Tent, Foot Stop, ¼” dia. (foot stop) (Stock No. 24-L-448)
9. Door flap
10. Lug
11. 6 x Lines, Tent, 2′ 6″, sewed-2-end, ¼” dia. (door fastener) (Stock No. 24-L-470)
10 x Lines, Tent, 3′ 4″, sewed-1-end, ¼” dia. (door fastener) (Stock No. 24-L-480)
12. 2 x Lines, Tent, 3′ 4″, sewed-1-end, ¼” dia. (door flap line) (Stock No. 24-L-479-50)
4 x Lines, Tent, 14′, w/eye, 5/16″ dia. (corner line) (Stock No. 24-L-565)
1 x Pole, Tent, Upright, 12′ 3″, Complete, Jointed (Stock No. 24-P-266)
28 x Pins, Tent, 16″ (Stock No. 24-P-49)
1 x Chain and Plate, Tent, Pyramidal, M-1934, 16½” x 17′ (Stock No. 24-C-573)
4 x Hooks, Tent, End, Pyramidal, M-1934, 5/16″ (Stock No. 24-H-167)
4 x Hooks, Tent, S, Pyramidal, M-1934, 5/16″ (Stock No. 24-H-174)
28 x Slips, Tent, Wire (Stock No. 24-S-1070)
Pitching:
The Commander designates the line on which the tents are to be erected. The line of tents is marked by driving a wall pin on the spot to be occupied by the right front corner of each tent. The interval between adjacent marking pins should be 30 feet. This leaves space of about 2 feet between tents. Each tent is usually erected by the squad which will occupy it. It takes four men approximately 30 minutes to erect.
Striking:
- Remove all pins except those of the four corner lines and the two rear corner wall pins. Pile them, or place them in a container.
- Remove the four side-wall upright poles.
- With one man holding each corner line, slowly lower the tent to the rear. Fast the poles together and collect the remaining pins.
Folding:
- Pull back wall and top canvas out smooth. This is done by leaving the rear corner wall pins in the ground with the foot stops attached. One man at each corner line and one or two men holding the chain and plate assembly perpendicular, pull the canvas to its limit away from the former front of the tent. This places the three remaining sides of the tent on top of the rear side, with the door side in the middle.
- To straighten the right side wall and top canvas, carry the right front corner over and lay it on the left front corner. Pull the canvas smooth and the bottom edges even. Throw the eave lines towards the chain and plate assembly. Return the right front corner to the right in order to cover the right rear corner. This folds the right side of the tent on itself with a crease in the middle. This fold will now be under the front side of the tent.
- To straighten the left side wall and top canvas, carry the left front corner to the right and rear in a similar fashion. This will leave the front and rear sides of the tent lying smooth and flat ad the two side walls folded inward, each on itself.
- Make sure the sod cloth is folded under all around the tent.
- Fold in the bottom of the wall approximately 1 foot. Fold the chain and plate assembly downward toward the bottom of the tent. Place the hood on the chain and plate assembly. The tent is now folded with the chain and plate assembly as a core, all folds being placed down flat and smooth and parallel to the bottom of the tent. If each fold is compactly made and the canvas is kept smooth, the last fold will exactly cover the lower edge of the canvas.
- Lay all the exposed eave lines, except the two on the center panel, along the folded canvas. Pull these two out and away from the bottom edge to their extreme length so that they may be used later for the final tying of the bundle.
- Fold the bundle from one end toward the center at the first seam (that is, the seam joining the first and second panels). Fold the bundle again toward the center so that the canvas already folded will come within about 3 inches of the middle panel. Fold the bundle once again to the far seam of the middle panel. Starting from the opposite end of the bundle, fold the first panel width in half. Fold this again. This will bring it about 4 or 5 inches from the part of the tent already folded from the first end. Throw this second fold completely over the part already folded.
- Draw the exposed eave lines taut toward and across one another so that they are at right angles. Turn the bundle over on the eave lines. Cross the lines again on the new top of the bundle. Turn the bundle over again on the crossed lines and tie the lines with a slipknot.
- When properly tied and pressed together the bundle will be about 11 by 23 by 34 inches.
- The unit designation, stencilled on the upper half of the middle width of canvas in the back wall, will appear on the exposed top of the bundle.

